Adobe Creative Cloud offers a plethora of powerful tools and services for creatives worldwide. However, circumstances may change, and you might find yourself needing to cancel your Adobe subscription. Whether you’re transitioning to a different software suite or simply taking a break, cancelling your Adobe subscription should be a straightforward process. In this guide, we’ll walk you through the steps to cancel your Adobe subscription hassle-free.
Step 1: Log into Your Adobe Account

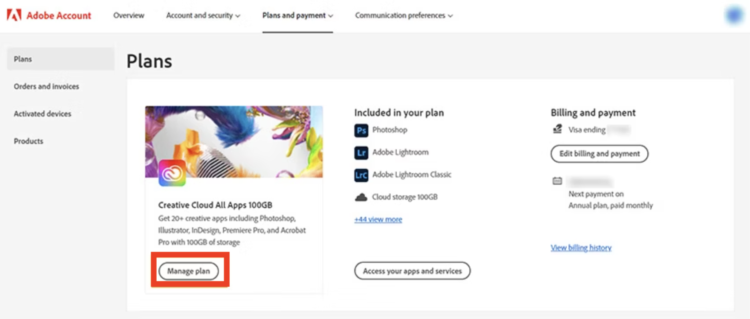
The first step is to log into your Adobe account on the Adobe website. Sign in at https://account.adobe.com/plans. Once logged in, navigate to the “Manage Plan” section of your account settings.
Step 2: Locate Your Subscription

In the “Plans” section, you’ll find a list of all the Adobe subscriptions associated with your account. Locate the subscription you wish to cancel and click on it to view the details.
Step 3: Review Cancellation Terms
Before proceeding with the cancellation, it’s essential to review the terms of cancellation, including any early termination fees or remaining contract obligations. This information will help you make an informed decision about cancelling your subscription.
Step 4: Initiate Cancellation
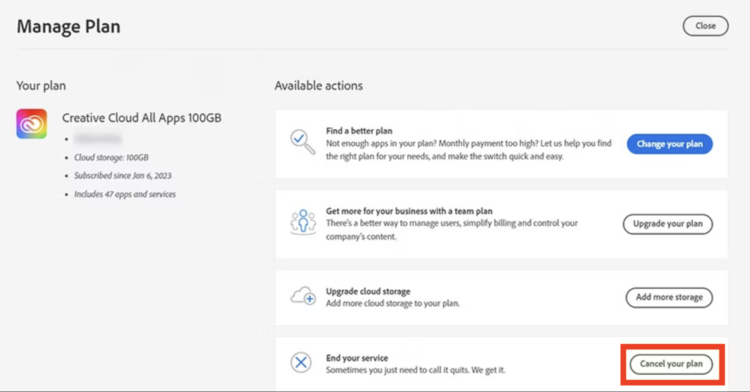
Once you’ve reviewed the cancellation terms, look for the option to cancel your subscription. This option is usually found under the subscription details or billing information. Click on the cancellation link or button to initiate the cancellation process.
Step 5: Follow Cancellation Prompts
Adobe may present you with a series of prompts or options when cancelling your subscription. These may include offers to pause your subscription instead of cancelling or providing feedback on your decision to cancel. Follow the prompts to proceed with the cancellation.
Step 6: Confirm Cancellation
After following the cancellation prompts, Adobe will ask you to confirm your decision to cancel your subscription. Review the details one last time to ensure accuracy, then confirm the cancellation.
Step 7: Receive Confirmation
Once you’ve confirmed the cancellation, Adobe will provide you with a confirmation message or email. This confirmation serves as proof that your subscription has been successfully cancelled. Be sure to save this confirmation for your records.
Step 8: Verify Cancellation
After cancelling your subscription, it’s a good idea to log back into your Adobe account to verify that the cancellation was processed correctly. Check your subscription status to ensure that it now reflects the cancellation.
Step 9: Adjust Billing Information (if necessary)
If you had automatic billing set up for your Adobe subscription, be sure to update your billing information to prevent any future charges. You can do this in the “Payment & Billing” section of your Adobe account settings.
Cancel Your Subscription
Cancelling your Adobe subscription is a straightforward process that can be completed online through your Adobe account. By following the step-by-step guide outlined above, you can cancel your subscription hassle-free and with confidence. Whether you’re looking to explore other software options or simply taking a break, knowing how to cancel your Adobe subscription empowers you to make decisions that best suit your needs.


