
At first glance, replacing an Apple AirTag battery sounds almost laughably easy. Most guides make it look like a two-second job: press, twist, and you’re done. But reality often tells a very different story.
If your AirTag has spent months—or years—tossed inside a backpack, rolling around in a car, or exposed to dust and grit, the shiny metal cover can become stubbornly stuck. Suddenly, that simple twist turns into a frustrating struggle. The good news? You don’t need tools, force, or risky tricks to fix it. You just need the right approach.
Why AirTag Covers Get Stuck in the First Place
Apple designed the AirTag to be compact and durable, but daily use takes a toll. Dirt, sand, and wear slowly build resistance between the metal cover and the plastic body. Over time, this makes the locking mechanism harder to turn, even though the AirTag itself still works perfectly.
Many people panic at this stage and reach for sharp objects or screwdrivers. That’s a mistake. Prying can crack the casing or damage the internal components. There’s a safer—and surprisingly simple—solution.
What You Actually Need Before You Start
Before opening anything, make sure you have the right replacement battery. Apple AirTags use a CR2032 battery, a common coin-style battery sold almost everywhere. It’s affordable, widely available, and not proprietary. You can find it at grocery stores, convenience shops, or online retailers, often in multi-packs.
Make sure you note the plus (+) side of the battery before installation. That detail matters later.
The Correct Way to Open a Stuck AirTag
Start by placing the AirTag shiny side up on a stable surface. The goal is to twist only the metal cover while keeping the plastic body steady.
Apply firm downward pressure with your thumbs and turn the metal cover counterclockwise (to the left). This downward force is just as important as the twisting motion. Many failed attempts happen because people try to twist without pushing down enough.
If your fingers slip or you can’t generate enough grip, don’t worry. This is where the real fix comes in.
The Tape Trick That Actually Works
When the cover refuses to budge, grab a piece of packing tape. Any strong tape will do.

Cut a small strip and stick it directly onto the metal cover, avoiding the plastic edge. Press it firmly so it adheres well. The tape increases friction, giving your fingers something solid to grip.
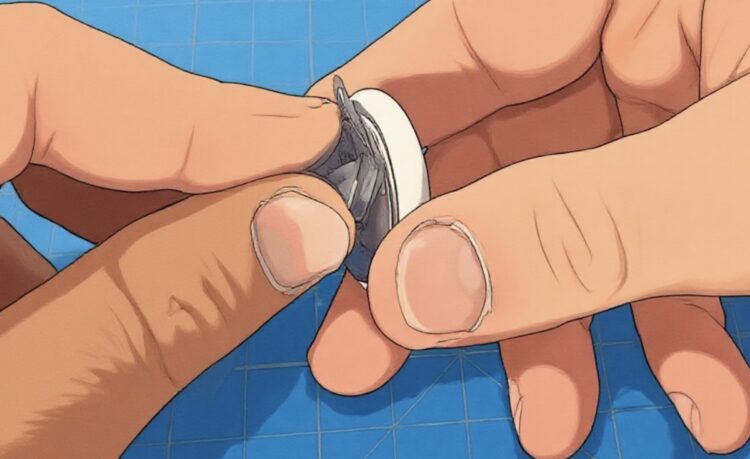
Hold the plastic base securely, push down, and twist counterclockwise again. The added traction usually makes the difference. For extremely stuck covers, you can fold or bunch the tape slightly to create a longer “tail,” giving you extra leverage without damaging the AirTag.
Once loosened, the cover should pop off cleanly.
Replacing the Battery Safely
Inside, you’ll see the old CR2032 battery sitting with the plus side facing up. Remove it carefully and set it aside.
Used coin batteries are dangerous if swallowed, especially for children and pets. Dispose of them properly according to local recycling or battery disposal guidelines.
Insert the new battery with the plus side up. You should hear a soft sound confirming the AirTag has power again.
Closing the AirTag Properly
Line up the metal cover with the plastic body and gently press it into place. Twist it clockwise until it locks. It only needs a small turn. Make sure it sits flush and feels secure before using it again.
That’s it. No tools. No damage. No stress.
The Takeaway
Replacing an AirTag battery doesn’t have to be a battle—even when the cover feels impossible to open. The key is patience, proper pressure, and using friction instead of force. A simple piece of tape can save you from cracked plastic, scratched metal, or a broken tracker.
Sometimes the best fix isn’t more strength—it’s a smarter technique.